 Tweet
Tweet
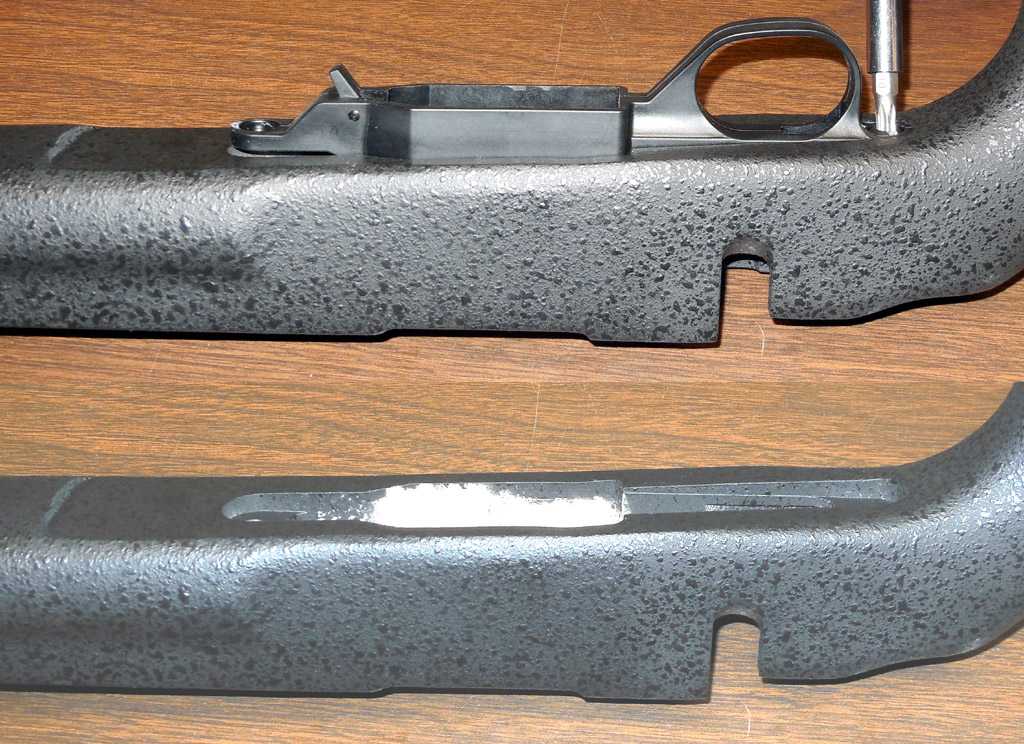
When I was fitting the two barreled actions into the two Boyd's Stocks that I picked out, there were dramatic differences in the dimensions for the pillars.
One fed 4 out of 5 from the magazine, and the 5th needed a fairly slow push from the bolt, or it wold catch the bottom of the feed ramp and lock up. The other shot the nose up so high it would lock up with the nose in the top of the breech. Basically both needed the gap closed up between the bottom metal (plastic) and the action.
Both Legacy, and their local gunsmith they use and refer to in NV had no numbers for the distance from the bottom of the action to the top of the bottom plate. The gunsmith did state that you did not want direct contact with the top of the magazine well and the receiver - this would lock the bolt up on the magazine - especially when the bolt was pulled back, the magazine would pop up in front of the bolt. Also want one to be careful about torqueing to the 50"#, the bottom plate had a tendency to split right up the seam in the middle.
Ultimately what I did was make .05" adjustments in the gaps until I got proper feeding with the magazine pushed all the way in, and out (there is some slop - if you are shooting off some bags and resting on the magazine it will push it in deeper) then fine tuning for that edge of function to get a working range.
The working numbers that I got for the front was .600" to .650" and the rear was 1.125" to 1.170" You still got function if you went longer in the rear, but the nose (123 ELD) was right on the edge of the feed ramps.
Bear in mind when you torque the action screws down it will compress the plastic a bit. Both rifles were fitted at .125 in the rear but compressed enough that the action screws protruded enough to cause interference with the bolt, so I had to add a brass washer between the bottom plate and the stock to get some clearance.
I would also like to note that Boyd's stocks are inverted on the angle for the bottom plate. The bottom plate is not parallel with the action (the mag well is, but not the mounting surface). This required milling of the rear behind the trigger guard, which if you have a mill, then this is a piece of easy. Otherwise you are trying to do this with a scraper, dremmel, or other Bubba methods.
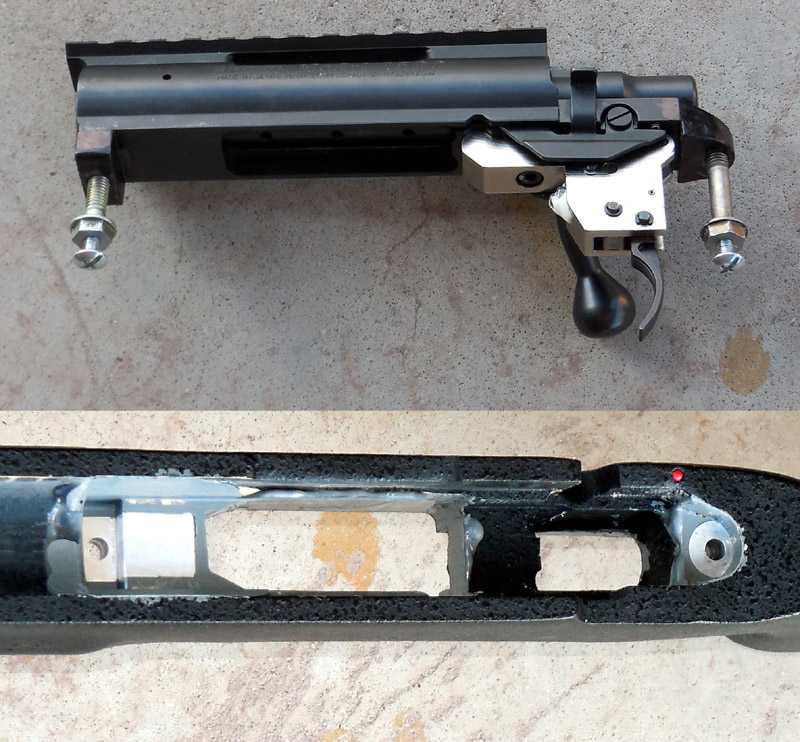
I am going to try to bed the bottom plates to make it as flat as possible to get as much bearing surface for the plastic as I can, even though I did pillar the action screws. Another member here did bore out his bottom plate and put in a machined bushing to go with a better fit and not compress the plastic. If I had a lathe I would go this route, but I don't and the thought of trying to cut a piece of brass bushing down to 5/32 with a dremmel and get a parallel surface does not appeal to me. I had enough fun trying to cut the pillar tubes down and get them square.
Both stocks needed inletting for the bolt handle, and the barrel on the left side. Nothing major here, then tape wrapped around the barrel until it took minor pressure to drop in the barrel channel to keep it centered in the stock. Both Boyds stocks I took some 6mm bolts (65mm long), cut the heads off, and wrapped some masking tape (blue) around the bolt until they were sung in the pillar sleeves to keep it centered and push any epoxy all the way through. I did forget to put release agent inside the sleeves, so after the first 2 hours of setting, I unscrewed each bolt 1/4 turn, and did this once an hour x3 then what would have been the forth session, I removed them entirely so there would be little to no epoxy inside the sleeves.
The Aluminum HCR chassis I also had to bed the action in. There was significant play that would actually bind up the magazine and prevent insertion if the action was pushed all the way to the back. I just loosened up the action screws enough to nudge the action back and forth to get the mag centered in the action and made witness marks to locate the action when seating in the bedding compound. I used a couple pieces of para cord with tape wrapped around the end until it was a snug fit in the action screw holes then the modeling clay on top of those (was worried about the pressure of the epoxy pushing the clay out/down.
One fed 4 out of 5 from the magazine, and the 5th needed a fairly slow push from the bolt, or it wold catch the bottom of the feed ramp and lock up. The other shot the nose up so high it would lock up with the nose in the top of the breech. Basically both needed the gap closed up between the bottom metal (plastic) and the action.
Both Legacy, and their local gunsmith they use and refer to in NV had no numbers for the distance from the bottom of the action to the top of the bottom plate. The gunsmith did state that you did not want direct contact with the top of the magazine well and the receiver - this would lock the bolt up on the magazine - especially when the bolt was pulled back, the magazine would pop up in front of the bolt. Also want one to be careful about torqueing to the 50"#, the bottom plate had a tendency to split right up the seam in the middle.
Ultimately what I did was make .05" adjustments in the gaps until I got proper feeding with the magazine pushed all the way in, and out (there is some slop - if you are shooting off some bags and resting on the magazine it will push it in deeper) then fine tuning for that edge of function to get a working range.
The working numbers that I got for the front was .600" to .650" and the rear was 1.125" to 1.170" You still got function if you went longer in the rear, but the nose (123 ELD) was right on the edge of the feed ramps.
Bear in mind when you torque the action screws down it will compress the plastic a bit. Both rifles were fitted at .125 in the rear but compressed enough that the action screws protruded enough to cause interference with the bolt, so I had to add a brass washer between the bottom plate and the stock to get some clearance.
I would also like to note that Boyd's stocks are inverted on the angle for the bottom plate. The bottom plate is not parallel with the action (the mag well is, but not the mounting surface). This required milling of the rear behind the trigger guard, which if you have a mill, then this is a piece of easy. Otherwise you are trying to do this with a scraper, dremmel, or other Bubba methods.
I am going to try to bed the bottom plates to make it as flat as possible to get as much bearing surface for the plastic as I can, even though I did pillar the action screws. Another member here did bore out his bottom plate and put in a machined bushing to go with a better fit and not compress the plastic. If I had a lathe I would go this route, but I don't and the thought of trying to cut a piece of brass bushing down to 5/32 with a dremmel and get a parallel surface does not appeal to me. I had enough fun trying to cut the pillar tubes down and get them square.
Both stocks needed inletting for the bolt handle, and the barrel on the left side. Nothing major here, then tape wrapped around the barrel until it took minor pressure to drop in the barrel channel to keep it centered in the stock. Both Boyds stocks I took some 6mm bolts (65mm long), cut the heads off, and wrapped some masking tape (blue) around the bolt until they were sung in the pillar sleeves to keep it centered and push any epoxy all the way through. I did forget to put release agent inside the sleeves, so after the first 2 hours of setting, I unscrewed each bolt 1/4 turn, and did this once an hour x3 then what would have been the forth session, I removed them entirely so there would be little to no epoxy inside the sleeves.
The Aluminum HCR chassis I also had to bed the action in. There was significant play that would actually bind up the magazine and prevent insertion if the action was pushed all the way to the back. I just loosened up the action screws enough to nudge the action back and forth to get the mag centered in the action and made witness marks to locate the action when seating in the bedding compound. I used a couple pieces of para cord with tape wrapped around the end until it was a snug fit in the action screw holes then the modeling clay on top of those (was worried about the pressure of the epoxy pushing the clay out/down.


Comment