Howa Hinged Floor Plate Rifle Build

Collapse
X
 
  • Filter
  • Time
  • Show
Clear All
new posts
  • Sixoeight
    Warrior
    • Jul 2018
    • 172

    Howa Hinged Floor Plate Rifle Build

    I had an idea I just couldn't shake. I wanted to "build" a Grendel bolt action hunting rifle to replace my 9.5 lb savage 308 heavy barrel. I don't however like protruding magazines or plastic on hunting rifles. I started thinking about hybridizing a Howa Mini action to some other internal magazine system. The CDI bottom metal kit uses 308 mags for the Howa mini so why not use a 308 internal box mag?

    I bought a NOS take off Howa SA 308 bottom metal and box magazine off of GunBroker. If I could get this to work it would kill 2 birds with one stone - No Plastic on the outside - and no ugly magazine. I knew that the action screws were going to be spaced differently but it seemed like an interesting challenge.

    I got my 20" barreled action in today and couldn't help working on some prototyping. At first I tried the 308 box magazine and follower. It sort of works but it is much wider than the opening at the bottom of the receiver so it would constantly bind up. I also tried a 223 Howa SA magazine and follower but this did not work either. Just because I could I tried using the stock plastic magazine well as the internal magazine itself because it is a similar size to the 308 box mag. It's hard to explain but you will see in the video.

    I also want to note that this is a ziptied rough rough prototype just for testing the ability for the bolt to strip rounds from the bottom metal and box mag combo. In this video I still have to cut the magazine box down. At the moment I haven't trimmed it down at all so the trigger isn't even able to sit in the triggerguard but that's easy enough to fix.


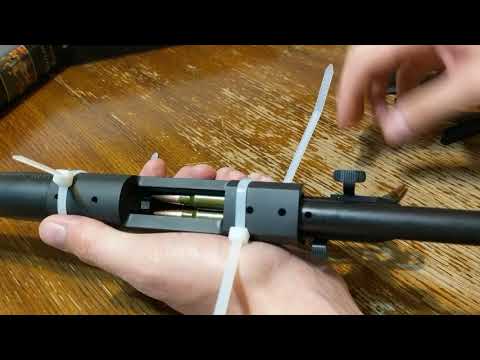
    The bolt can strip rounds reliably. In the video I don't cycle the bolt completely because they are live rounds (I have the gun pointed in a safe direction). Because I don't cycle the action completely they don't ever get grabbed by the extractor. KSwhitetails on here has some dummy rounds for me to pick up tomorrow so that I can do more testing.

    I think this might be doable. I will keep updating this post once my Boyd's stock comes in and I start inletting for this odd setup.
    Last edited by Sixoeight; 07-24-2018, 02:33 AM.
  • rabiddawg
    Chieftain
    • Feb 2013
    • 1664

    #2
    Are you aware of the modification that results in a flush fitting mag? If not do a search.

    If you insist on a hinged floor plate, carry on!
    Knowing everthing isnt as important as knowing where to find it.

    Mark Twain

    http://www.65grendel.com/forum/showt...2-Yd-Whitetail

    Comment

    • Sixoeight
      Warrior
      • Jul 2018
      • 172

      #3
      I am aware of the magazine mods. To be honest I hoped it would be a bit simpler than it is turning out to be, but the challenge of doing something unique is half the fun for me.

      Comment

      • Kswhitetails
        Chieftain
        • Oct 2016
        • 1914

        #4
        Now I'm getting the picture! I like it! Working so far, what are your challenges yet to overcome? Seems like it works so far.
        Nothing kills the incentive of men faster than a healthy sense of entitlement. Nothing kills entitlement faster than a healthy sense of achievement.

        Comment

        • RockWarrior
          Bloodstained
          • Sep 2015
          • 39

          #5
          I had a similar idea but I didn't want to buy the extra parts. Looks good so far, I hope you succeed. Keep up the good work.

          Comment

          • Sixoeight
            Warrior
            • Jul 2018
            • 172

            #6
            Originally posted by Kswhitetails View Post
            Now I'm getting the picture! I like it! Working so far, what are your challenges yet to overcome? Seems like it works so far.
            Thanks again for the dummy rounds! They will come in handy.

            One of the upcomming challenges will be inletting the stock for the oversized bottom metal. This shouldn't be too hard. I plan to rework the whole stock anyway hollowing out the butt and under the barrel to reduce weight. I will also need to thoroughly bed all of the action, magazine, and probably the bottom metal as well to be sure it all stays in place.

            I also need to cut down the "magazine" box so that the bottom metal will sit flush with the bottom of the stock. Right now it would have a 1" air gap haha which would be a problem.

            The biggest challenge will be the action screws... I was hoping to be able to just simply drill a new front action screws hole in the SA bottom metal and then round off the section with the old hole. But it turns out that to position the magazine correctly I need to move the bottom metal back enough that the rear screw will not align either. This means that the bottom metal action screws sit about 5/16" behind and in front of the receiver action screw holes. To solve this I am planning on embedding small blocks of aluminum in the stock between these screws. I will drill a through hole for the receiver action screw and then next to it drill and tap another hole for the bottom metal screw. In essence my receiver will bolt directly to my stock and the bottom metal will also bolt to the stock. So you could take the bottom metal off without loosening the receiver whatsoever.

            I am sure this description is hard to understand without pictures or a diagram so I will work one up to clarify. I think it could make for very solid receiver and stock mating that may rival the more traditional system but it is certainly more complicated and more work to pull off. Again this project probably isn't worth while for most people but these kinds of things are a bit of a hobby for me.

            If anyone has suggestions or sees problems let me know. I actually didn't expect to get it feeding so quickly but it is a good sign.

            Comment

            • Stevil
              Banned
              • Dec 2015
              • 121

              #7
              love ya enthusiam sixoeight but Im not sure how youre gooijg to get around the difference in action screw spacing ??

              I grabbed a SA howa bottom metal about 2years ago with a clever buddy but we just couldnt get past the spacing issue. goodluck

              Comment

              • ricsmall
                Warrior
                • Sep 2014
                • 987

                #8
                Can you shorten the bottom metal much the same way model 70 actions used to be shortened when there were only long actions? Cut a chunk out of the middle and weld back together? Not sure of material of your piece. What kind of bottom metal comes on the Remington branded mini mausers? Model 799 I think.
                Member since 2011, data lost in last hack attack

                Comment

                • Sixoeight
                  Warrior
                  • Jul 2018
                  • 172

                  #9
                  Originally posted by Stevil View Post
                  love ya enthusiam sixoeight but Im not sure how youre gooijg to get around the difference in action screw spacing ??

                  I grabbed a SA howa bottom metal about 2years ago with a clever buddy but we just couldnt get past the spacing issue. goodluck
                  The spacing is an issue but I think I can get around it in a way that works just as well and is invisible from the outside.

                  Originally posted by ricsmall View Post
                  Can you shorten the bottom metal much the same way model 70 actions used to be shortened when there were only long actions? Cut a chunk out of the middle and weld back together? Not sure of material of your piece. What kind of bottom metal comes on the Remington branded mini mausers? Model 799 I think.
                  I am using the Howa SA bottom metal. It could be cut and welded but that's a lot of hassle to cut maybe a half inch out of it. I am just going to leave it a bit longer and it should have no negative affect and would only be apparent if you measured it. I think it could look like it is a factory rifle when I am done if I do my part right.

                  Comment

                  • Sixoeight
                    Warrior
                    • Jul 2018
                    • 172

                    #10
                    Initial mock up


                    You can see the inletting that will be required. Not really that much actually. I may wait on hollowing out the stock because the decelerator butt pad seems to be glued on. It's very nicely fit so I am not sure I want to mess with it.

                    I think it will be slick little rifle when I am done!

                    Comment

                    • Stevil
                      Banned
                      • Dec 2015
                      • 121

                      #11
                      Originally posted by ricsmall View Post
                      Can you shorten the bottom metal much the same way model 70 actions used to be shortened when there were only long actions? Cut a chunk out of the middle and weld back together? Not sure of material of your piece. What kind of bottom metal comes on the Remington branded mini mausers? Model 799 I think.
                      the metal is cheap cast so I doubt welding would be possible, that was first thought when i grabbed one.

                      Comment

                      • Sixoeight
                        Warrior
                        • Jul 2018
                        • 172

                        #12
                        Started some rough stock reshaping. I thinned it out quite a bit because these Boyd's stocks are always like gripping a 2x4. I also contoured the palm swell to fit my hand.


                        Comment

                        • bj139
                          Chieftain
                          • Mar 2017
                          • 1968

                          #13
                          It looks like the back screw-trigger spacing is correct.
                          At the front, can you shorten the yoke and the part in between the yoke and redrill a pivot hole?

                          Comment

                          • Sixoeight
                            Warrior
                            • Jul 2018
                            • 172

                            #14
                            Originally posted by bj139 View Post
                            It looks like the back screw-trigger spacing is correct.
                            At the front, can you shorten the yoke and the part in between the yoke and redrill a pivot hole?
                            That's what I had hoped...

                            But the span between the trigger guard and the magazine is longer on the short action so both screws most likely need to be relocated. There isn't enough extra metal to drill a new hole anyway so that won't work. It's going to be more work and I will have to be creative but I'm going to go for it.

                            The other advantage of relocating the screws is that I won't have to do any painting! I've never liked painting stuff that sees much use because it always wears more than the OEM finish.
                            Last edited by Sixoeight; 07-25-2018, 05:46 AM.

                            Comment

                            • Sixoeight
                              Warrior
                              • Jul 2018
                              • 172

                              #15
                              Took care of the inletting. More was required than I expected but it helps to have a drill press with an xy table on it. Works surprisingly well as long as you never attempt to climb cut!

                              There are a few gaps to fill in with bedding compound but overall I am pleased.


                              Last edited by Sixoeight; 07-25-2018, 10:51 PM.

                              Comment

                              Working...
                              X