
 Tweet
Tweet
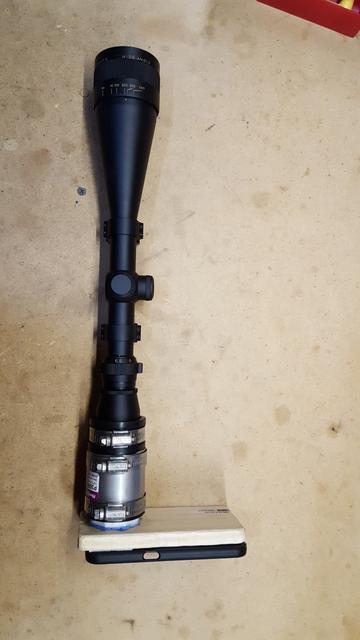
Now don't laugh fella's....it may look clunky and unsightly but it works well and is pretty stable as far as I can tell.....haven't actually shot with it yet but everything lines up with the scope and initial testing shows that it will work just fine.
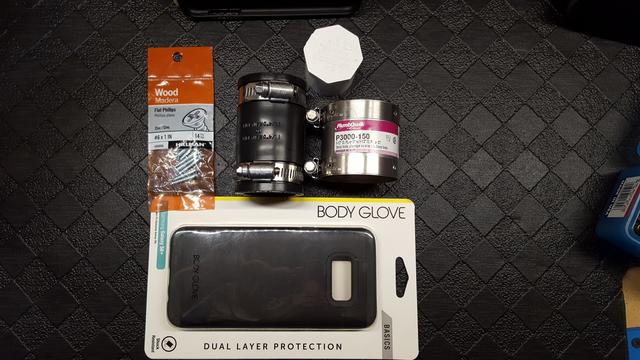
Here are the materials that I used.....the plumbing stuff came from Lowe's and the cheap phone case came from Wal-mart.
1 - Cheap rubber cell phone case (one with a surface that can be taped (or glued I suppose)....I scuffed up the back of the rubber one that I used)
1 - Piece of lighter weight 1/2" wood (I think I used pine) cut to the same dimensions as the cell phone case
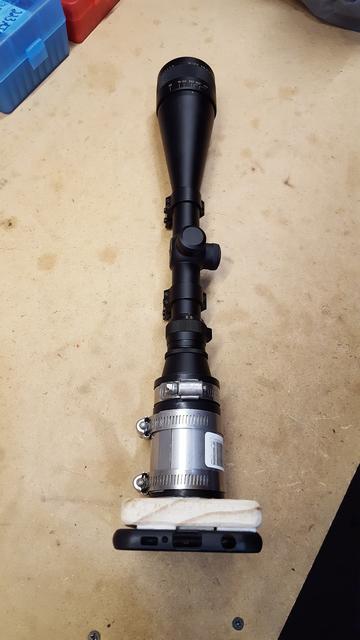
1 - 1 1/4" to 1 1/4" drain pipe to drain pipe coupling
1 - 1 1/4" PVC plug (flat)
1 - 1 1/2" Banded hose clamp rubber coupling (I bought it just for the banded hose clamp and didn't use the rubber insert)
4 - #6 x 1" wood screws (make sure they are small enough to fit into the sides (edge) of the plug without splitting it after the pilot holes are drilled but long enough to go through both parts to ensure a good bond)
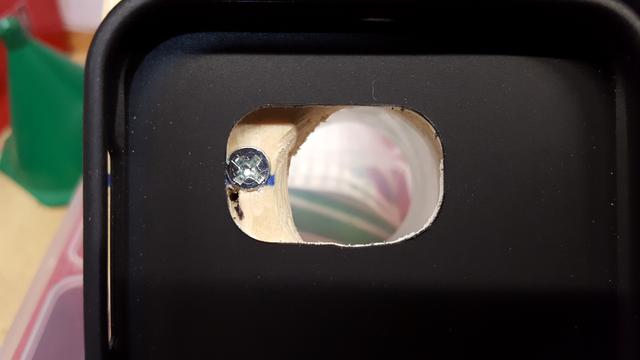
1. Mark the chunk of wood where the center of the camera lens will be...(Add a little extra space to the top....say 1/2" to 3/4".....so you can have plenty of room to mount the plug)
2. Center the plug over the camera lens hole.
(I did step 5 before I did step 3 but I think it would be easier to do in this order before the big hole is drilled....you can do whatever you think will be the easiest for you.....but you gotta be careful when using the wood bit not to hit the screws if you chose to do step 3 first)
3. Drill 4 pilot holes into the piece of wood and *sides* of the PVC plug to screw the #6 screws into them to fasten the two parts together (*this is a fiddly part because the sides of the plug are pretty thin*).....I screwed a plug up getting this right so take your time and measure three times......clamping the plug and wood together helps but the clamp needs to be small enough to drill around.
4. Screw the wood and plug together.....you want the screws countersunk so they don't interfere with your phone and case.
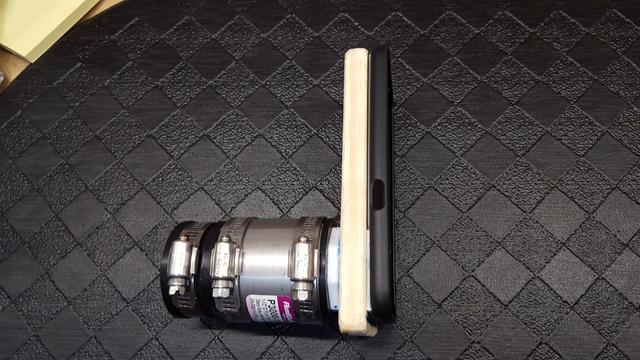
5. Using a 1" wood bit drill a hole through the center of the PVC plug all the way through it and the board. (the hole doesn't look round but it is.....mounting the phone case with the camera centered covered up part of the 1" hole)

6. Fasten the phone case so that the camera lens hole is centered above the hole in the plug and the board....I had my phone in the case while lining it up to make sure the lens had an unobstructed view through the hole.....I used double-sided tape for this and it worked very well.
7. Remove 1 hose clamp from the 1 1/4" to 1 1/4" drain pipe connector.
8. Remove the rubber piece from inside the banded hose clamp so you just have the band with the hose clamps.
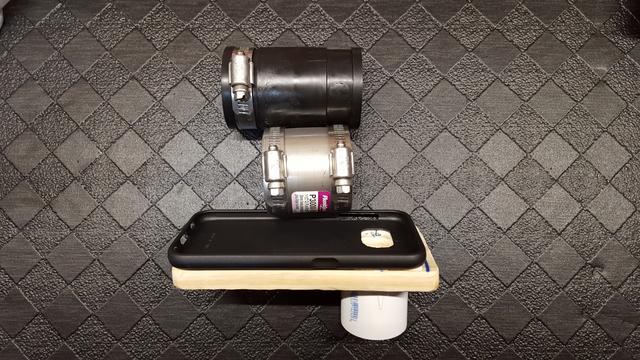
9. Slip the banded hose clamp over the drain pipe connector.....this will give you 3 places to tighten the contraption.
10. Slip the assembled banded hose clamp and drain pipe connector over the 1 1/4" drain plug that is attached to the piece of wood and phone case.....it should be a snug fit.
11. Snug up the hose clamp on the plug
12. Slide the other side over the eye piece of your scope.....You can move this back and forth depending on your eye relief and snug it down with the other 2 hose clamps when you have it positioned correctly.......The middle hose clamp is mainly used to keep everything lined up so that the rubber coupling doesn't sag causing the camera lens to be off center....it doesn't need to be tight...just snug enough to hold everything in-line.
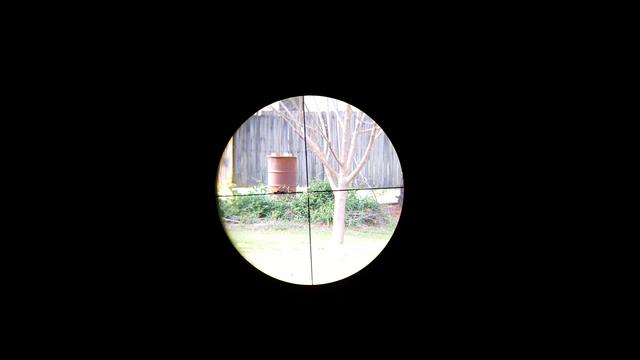
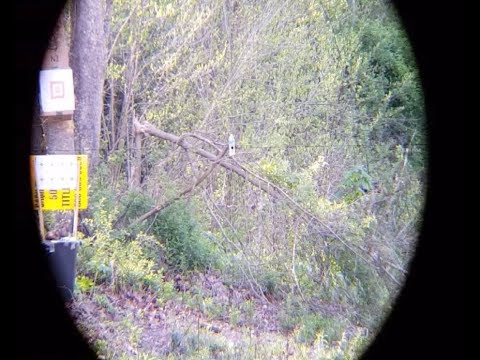
There's the short and sweet of it.....I'll be glad to answer some questions if I can.....Keep in mind that I just made this up on the fly based on what I could find on the internet.
I can only attach 4 pictures to one post.....I'll reply with the completed product.
Here are the materials that I used.....the plumbing stuff came from Lowe's and the cheap phone case came from Wal-mart.
1 - Cheap rubber cell phone case (one with a surface that can be taped (or glued I suppose)....I scuffed up the back of the rubber one that I used)
1 - Piece of lighter weight 1/2" wood (I think I used pine) cut to the same dimensions as the cell phone case
1 - 1 1/4" to 1 1/4" drain pipe to drain pipe coupling
1 - 1 1/4" PVC plug (flat)
1 - 1 1/2" Banded hose clamp rubber coupling (I bought it just for the banded hose clamp and didn't use the rubber insert)
4 - #6 x 1" wood screws (make sure they are small enough to fit into the sides (edge) of the plug without splitting it after the pilot holes are drilled but long enough to go through both parts to ensure a good bond)
1. Mark the chunk of wood where the center of the camera lens will be...(Add a little extra space to the top....say 1/2" to 3/4".....so you can have plenty of room to mount the plug)
2. Center the plug over the camera lens hole.
(I did step 5 before I did step 3 but I think it would be easier to do in this order before the big hole is drilled....you can do whatever you think will be the easiest for you.....but you gotta be careful when using the wood bit not to hit the screws if you chose to do step 3 first)
3. Drill 4 pilot holes into the piece of wood and *sides* of the PVC plug to screw the #6 screws into them to fasten the two parts together (*this is a fiddly part because the sides of the plug are pretty thin*).....I screwed a plug up getting this right so take your time and measure three times......clamping the plug and wood together helps but the clamp needs to be small enough to drill around.
4. Screw the wood and plug together.....you want the screws countersunk so they don't interfere with your phone and case.
5. Using a 1" wood bit drill a hole through the center of the PVC plug all the way through it and the board. (the hole doesn't look round but it is.....mounting the phone case with the camera centered covered up part of the 1" hole)
6. Fasten the phone case so that the camera lens hole is centered above the hole in the plug and the board....I had my phone in the case while lining it up to make sure the lens had an unobstructed view through the hole.....I used double-sided tape for this and it worked very well.
7. Remove 1 hose clamp from the 1 1/4" to 1 1/4" drain pipe connector.
8. Remove the rubber piece from inside the banded hose clamp so you just have the band with the hose clamps.
9. Slip the banded hose clamp over the drain pipe connector.....this will give you 3 places to tighten the contraption.
10. Slip the assembled banded hose clamp and drain pipe connector over the 1 1/4" drain plug that is attached to the piece of wood and phone case.....it should be a snug fit.
11. Snug up the hose clamp on the plug
12. Slide the other side over the eye piece of your scope.....You can move this back and forth depending on your eye relief and snug it down with the other 2 hose clamps when you have it positioned correctly.......The middle hose clamp is mainly used to keep everything lined up so that the rubber coupling doesn't sag causing the camera lens to be off center....it doesn't need to be tight...just snug enough to hold everything in-line.
There's the short and sweet of it.....I'll be glad to answer some questions if I can.....Keep in mind that I just made this up on the fly based on what I could find on the internet.
I can only attach 4 pictures to one post.....I'll reply with the completed product.

Comment